Introduction
In
part 1 we setup the scene by creating a simple Silverlight/WCF application. In that application the Silverlight application is initialized, it made a call to the underlying WCF service operation “GetWelcomeText” and displayed the text on the UI. We used the
basicHttpBinding to establish communication between the SL client and WCF service. In this part, we are going to make some modifications to the configuration files,
IIS/Windows Server AppFabric settings and make the application work across boundaries between two different geographical locations using
Azure AppFabric Service Bus. The high level picture is going to look like
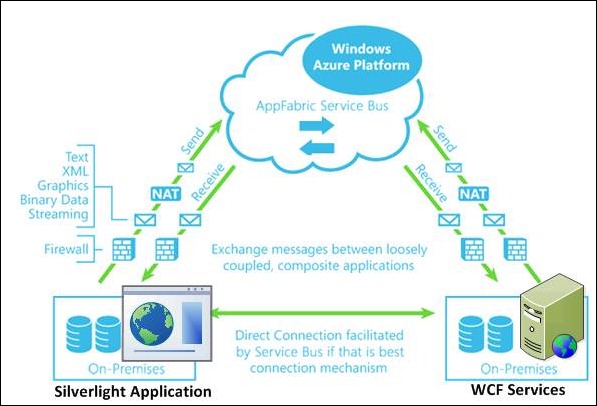 Source: http://biztalk360.com/
Prerequisite:
One of the challenges of
Silverlight and
Azure AppFabric service bus integration is configuring access to the
clientaccesspolicy.xml file. I’ve explained in detail, how you can resolve it in this blog post. It’s mandatory to complete the procedure explained in that post, before you proceed further.
It’s also mandatory to have
IIS/Windows Server AppFabric to complete this walkthrough. Please download and install it from
http://www.microsoft.com/download/en/details.aspx?id=15848
Create Service Endpoint Behaviour
Expand “
Advanced” and “
Endpoint Behavior” from the navigation tree and click on the link “
New Endpoint Behavior Configuration” as shown below

Click the “
Add” button, which will bring “
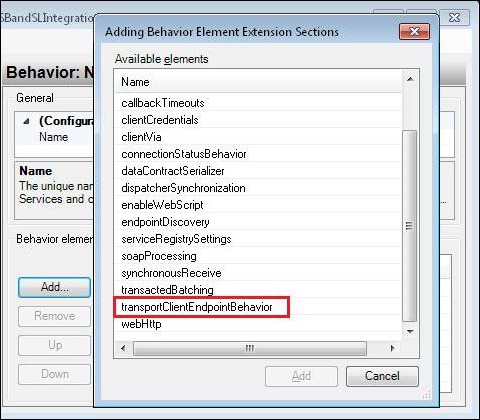
Adding Behavior element extensions” screen as shown below. From the list select “
transportClientEndpointBehavior” and click “Add”.
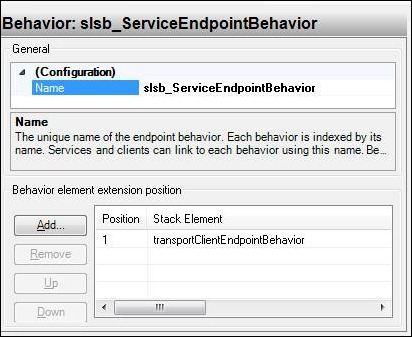
Change the name to “
slsb_ServiceEndpointBehavior“. The final screen should look as shown below
Double click on
transportClientEndpointBehavior from the list and make sure
CredentialType is
SharedSecret.
 Create a basicHttpRelayBinding
Navigate to “
Bindings” and select “
New Binding Configuration..” as shown below

On the “
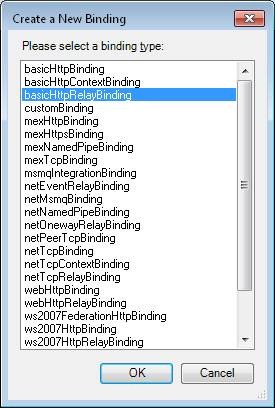
Create a New Binding” window select “
basicHttpRelayBinding” and click OK as shown below.
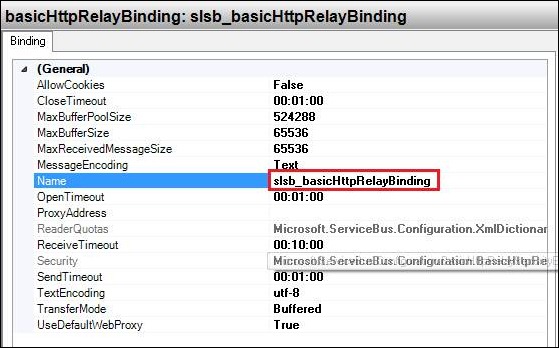
Change the name to
slsb_basicHttpRelayBinding, the final configuration should look as shown below.
 Create a new Endpoint
Now we are going to create a new WCF end point using the
endpointBehavior and
basicHttpRelayBinding we created in previous steps.
Navigate to
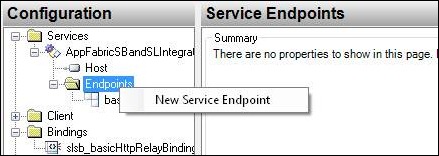
ServicesEndpoints, right-click and select “
New Service Endpoint” as shown below.
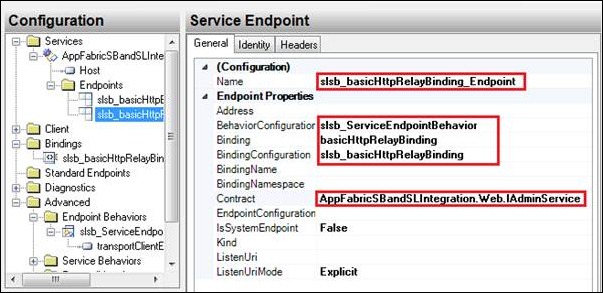
Once the properties window is displayed, provide the configurations as shown below.
The modified web.config file is going to look as shown below
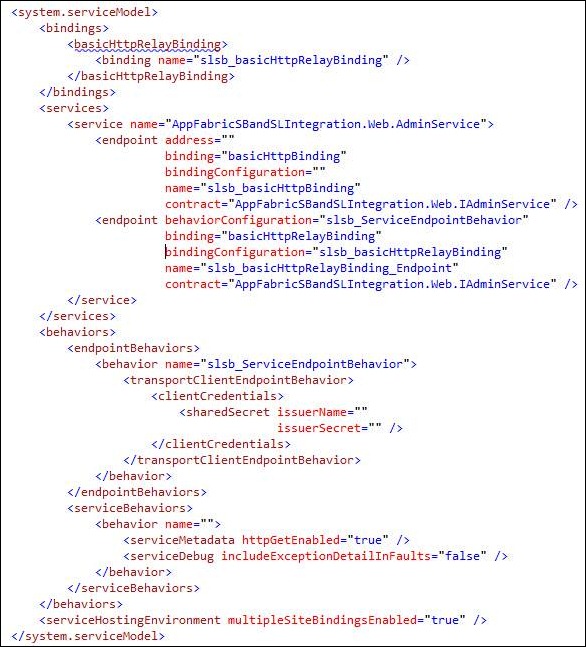
We are going to make few changes here, which we couldn’t do on the
SvcConfigEditor.exe tool. The modified web.config file is going to look as shown below
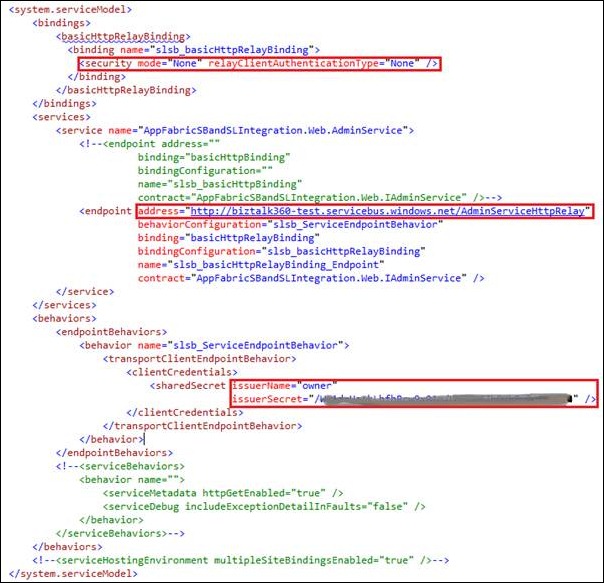
The objective for this demo is establishing communication between Silverlight application and remote WCF service via
Azure AppFabric service bus. So, we are going to ignore all the security settings for now, which I’ll cover in future articles. Things to note
Security is set to “
None”
Endpoint address is using “
http” (not “
https“)
Also, I commented out previous local endpoint configurations and things that are not really relevant for this demo to keep it simple.
Configure Virtual Directory in IIS/Windows Server AppFabric
You’ll need Windows Server AppFabric for this demo to work, which you can download from http://www.microsoft.com/download/en/details.aspx?id=15848
We are going to host our WCF service on
IIS/Windows Server AppFabric. The main reason for that is, we need to take advantage of the “Auto Start” functionality of
IIS/ Windows Server AppFabric to start our WCF service automatically when
IIS starts and register its namespace in the
Azure AppFabric Service bus. Previously this was one of the challenges, since the WCF services hosted just on IIS (without AppFabric) won’t get started until the first request hit the service. In this section we will see the configuration required on
IIS/Windows Server AppFabric for our WCF service.
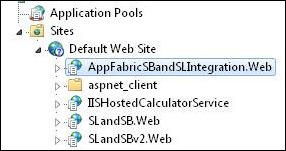
Start Internet Service Manager, and click on our virtual directory
AppFabricSBandSLIntegration.Web.
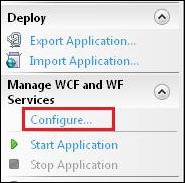
On the Actions column, under “
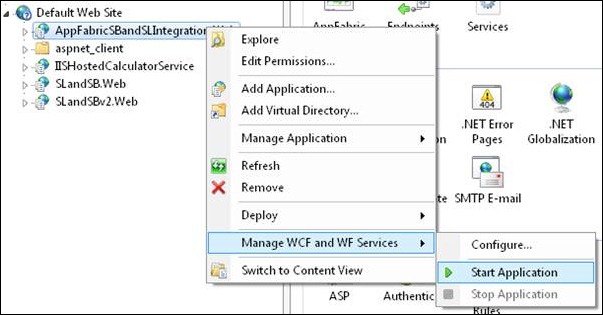
Manage WCF and WF Services“, click on “
Configure” as shown below
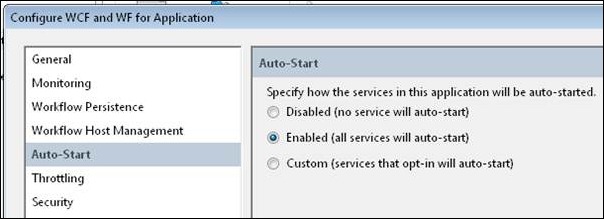
Select “
Auto-Start” and choose the option “
Enabled” as shown below.
After closing the window, you can Start the application, as shown in the below figure.
Reset IIS by opening a command prompt as administrator and typing
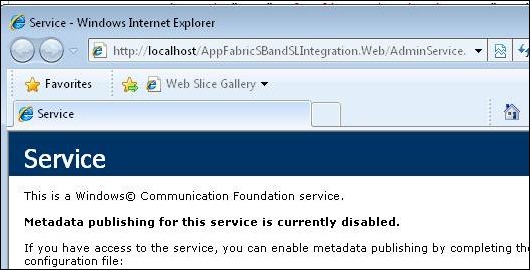
iisreset. Navigate to our WCF service as shown below and make sure there are no errors and it displays the page as shown below
One of the common errors I’ve seen, especially while working on corporate networks where a proxy server is used is
Unable to reach watchdog.servicebus.windows.net via TCP (9351, 9352) or HTTP (80, 443)
The solution for the problem is simple, on the web.config file just configure the proxy details as shown below.
<system.net>
<defaultProxy useDefaultCredentials=”true”>
<proxy proxyaddress=”http://<your proxy>:<your port>”/>
</defaultProxy>
</system.net>
You also need to make sure the virtual directory is configured to run under an IIS application pool, with the identity that access to proxy server.
 Update the Silverlight application to point to Azure AppFabric service bus URL
The final change we need to make is to update the Silverlight application configuration file ServiceReference.Clientconfig.config file with url pointing to the Azure AppFabric service bus url as shown below

Press F5 to run the application, and now you should see the application working as before but this time via the Azure AppFabric service bus.

One of the key things to note here is, on the Silverlight client side, I only modified the address in the endpoint element. That’s because basicHttpBinding is compatible with basicHttpRelayBinding.
The other important thing is, we relaxed the security completely and concentrated only on connectivity for this demo. So, don’t use this configuration in production.
 Source: http://biztalk360.com/
Prerequisite:
One of the challenges of Silverlight and Azure AppFabric service bus integration is configuring access to the clientaccesspolicy.xml file. I’ve explained in detail, how you can resolve it in this blog post. It’s mandatory to complete the procedure explained in that post, before you proceed further.
It’s also mandatory to have IIS/Windows Server AppFabric to complete this walkthrough. Please download and install it from http://www.microsoft.com/download/en/details.aspx?id=15848
Create Service Endpoint Behaviour
Expand “Advanced” and “Endpoint Behavior” from the navigation tree and click on the link “New Endpoint Behavior Configuration” as shown below
 Click the “Add” button, which will bring “Adding Behavior element extensions” screen as shown below. From the list select “transportClientEndpointBehavior” and click “Add”.
 Change the name to “slsb_ServiceEndpointBehavior“. The final screen should look as shown below
 Double click on transportClientEndpointBehavior from the list and make sure CredentialType is SharedSecret.
 Create a basicHttpRelayBinding
Navigate to “Bindings” and select “New Binding Configuration..” as shown below
 On the “Create a New Binding” window select “basicHttpRelayBinding” and click OK as shown below.
 Change the name to slsb_basicHttpRelayBinding, the final configuration should look as shown below.
 Create a new Endpoint
Now we are going to create a new WCF end point using the endpointBehavior and basicHttpRelayBinding we created in previous steps.
Navigate to ServicesEndpoints, right-click and select “New Service Endpoint” as shown below.
 Once the properties window is displayed, provide the configurations as shown below.
 The modified web.config file is going to look as shown below
 We are going to make few changes here, which we couldn’t do on the SvcConfigEditor.exe tool. The modified web.config file is going to look as shown below
 The objective for this demo is establishing communication between Silverlight application and remote WCF service via Azure AppFabric service bus. So, we are going to ignore all the security settings for now, which I’ll cover in future articles. Things to note
Security is set to “None”
Endpoint address is using “http” (not “https“)
Also, I commented out previous local endpoint configurations and things that are not really relevant for this demo to keep it simple.
Configure Virtual Directory in IIS/Windows Server AppFabric
You’ll need Windows Server AppFabric for this demo to work, which you can download from http://www.microsoft.com/download/en/details.aspx?id=15848
We are going to host our WCF service on IIS/Windows Server AppFabric. The main reason for that is, we need to take advantage of the “Auto Start” functionality of IIS/ Windows Server AppFabric to start our WCF service automatically when IIS starts and register its namespace in the Azure AppFabric Service bus. Previously this was one of the challenges, since the WCF services hosted just on IIS (without AppFabric) won’t get started until the first request hit the service. In this section we will see the configuration required on IIS/Windows Server AppFabric for our WCF service.
Start Internet Service Manager, and click on our virtual directory AppFabricSBandSLIntegration.Web.
 On the Actions column, under “Manage WCF and WF Services“, click on “Configure” as shown below
 Select “Auto-Start” and choose the option “Enabled” as shown below.
 After closing the window, you can Start the application, as shown in the below figure.
 Reset IIS by opening a command prompt as administrator and typing iisreset. Navigate to our WCF service as shown below and make sure there are no errors and it displays the page as shown below
 One of the common errors I’ve seen, especially while working on corporate networks where a proxy server is used is
Unable to reach watchdog.servicebus.windows.net via TCP (9351, 9352) or HTTP (80, 443)
The solution for the problem is simple, on the web.config file just configure the proxy details as shown below.
<system.net>
<defaultProxy useDefaultCredentials=”true”>
<proxy proxyaddress=”http://<your proxy>:<your port>”/>
</defaultProxy>
</system.net>
You also need to make sure the virtual directory is configured to run under an IIS application pool, with the identity that access to proxy server.
 Update the Silverlight application to point to Azure AppFabric service bus URL
The final change we need to make is to update the Silverlight application configuration file ServiceReference.Clientconfig.config file with url pointing to the Azure AppFabric service bus url as shown below
 Press F5 to run the application, and now you should see the application working as before but this time via the Azure AppFabric service bus.
 One of the key things to note here is, on the Silverlight client side, I only modified the address in the endpoint element. That’s because basicHttpBinding is compatible with basicHttpRelayBinding.
The other important thing is, we relaxed the security completely and concentrated only on connectivity for this demo. So, don’t use this configuration in production.